Warranty Service Center Management Guide
This guide gives you a complete overview of the Warranty Service Center Management page. This centralized portal allows you to easily add, update, and manage your authorized brand or manufacturer service centers for products covered under a Brand or Manufacturer Warranty.
The information you maintain here is directly shared with customers looking for warranty assistance, helping them locate, contact, and visit the right authorized service center for inspection, repairs, or replacements.
Important Rules & Guidelines
Before managing your service centers, please keep the following operational rules in mind:
- Authorized Service Centers Only: You must only add authorized brand or manufacturer service center details. Do not upload seller-managed or third-party service center information.
- Keep the Information up-to-date: You are entirely responsible for ensuring all data is accurate and up to date. Outdated, inactive, or incorrect information must be updated immediately to avoid negatively impacting the customer experience and warranty claims.
- Separate Forms for Multiple Locations: If you operate multiple service centers, you must submit a completely separate form for each individual location. This ensures each center has its own unique record for proper warranty validation.
- Approval Process: All submitted requests (additions, updates, activations, or deactivations) are subject to a formal review and approval process by the noon operations team.
- Track Request Status: All submitted requests, including additions, updates, activations, and deactivations, can be tracked through the "My Requests" tab within the Warranty Service Center Management page.
How to Access the Portal
You can access the portal by 2 ways.
Pathway 1
- Log in to your Seller Lab account. From the main sidebar menu, click on Catalog. Then click on My Catalog.
- Select Service centre (or My Service Centres) on the sidebar to open the management dashboard.
- Then click on the Add Service Center button in the top right corner.
Pathway 2
- Log in to your Seller Lab Account and then click on Catalog on the side menu. Then click on My Catalog.
- Select any SKU where you want to add the service center information.
- Under the offer section, scroll down to the Warranty section and click on Add Service Center button.
- You will be redirected to the page where you can update the service center details

Important: If you operate multiple service centers, you must submit a completely separate form for each individual location.
Adding a New Service Center
Once you access the form for adding a New Service Center, you can follow these simple steps to add the information.
- Complete the Service Center Approval Request form with the following details
- Service Center Details: Provide the name of the center in English and/or Arabic, specify the country, select the Service Center Type (e.g., Virtual contact with customer or Customers can visit service center directly), and add specific instructions. Then click on Next.
- Brand Details: Enter the authorized brand name, family, and product types handled by the center.
- Once the details are filled, click Submit to send the registration form to the operations team for review.
Tracking Your Submitted Requests
You can monitor the progress of your requests at any time:
- Open the My Requests tab at the top of the Service Center Management page.
- Use the available filters to quickly locate specific submissions
- Filter by Status: Filter requests by Pending, Approved, Rejected, or Cancelled.
- Filter by Request Type: Sort by Create, Update, Deactivate, or Activate.
Cancelling a Request
If you need to cancel a request, you can cancel it at any time while its status is still "Pending".
- You can go to My Requests and filter the request based on the Pending status. Then click on the Arrow button next to the request.
- A pop-up opens and shows the details of the request. Click Cancel Request at the bottom of the sidebar panel.
- Another pop-up appears to confirm your selection. Click on the Cancel Request button to move it to the Cancelled status.
Managing Approved Service Centers
Once a service center is approved, its details are officially published and visible to customers .
Viewing Approved Centers & Details
- Via Requests: Go to My Requests and then use the filter status to filter the request by the Approved status to see your successful submissions.
- Via Directory: Go to the Directory tab and select the brand. Then scroll down and click View Details next to an active service center to see its operational hours, contact details, and location link.
Updating Service Center Details
If operational hours, addresses, contact details, or supported product types change, you must update them promptly:
- Navigate to the Directory in the Service Center Management, select the specific Brand, Family, and Product Type.
- Click View Details on the center you wish to modify.
- A pop-up opens from the side, which gives an option to click the blue Request Update button.
- Check the box next to the fields you want to change, then update the information in the New Value space, and click Submit.
Deactivating a Service Center
If a service center permanently closes or stops servicing a specific brand, you must request deactivation.
- Navigate to the Directory in the Service Center Management, select the specific Brand, Family, and Product Type.
- Click View Details on the center you wish to deactivate.
- A pop-up opens from the side, which gives an option to click the red Request Deactivation button.
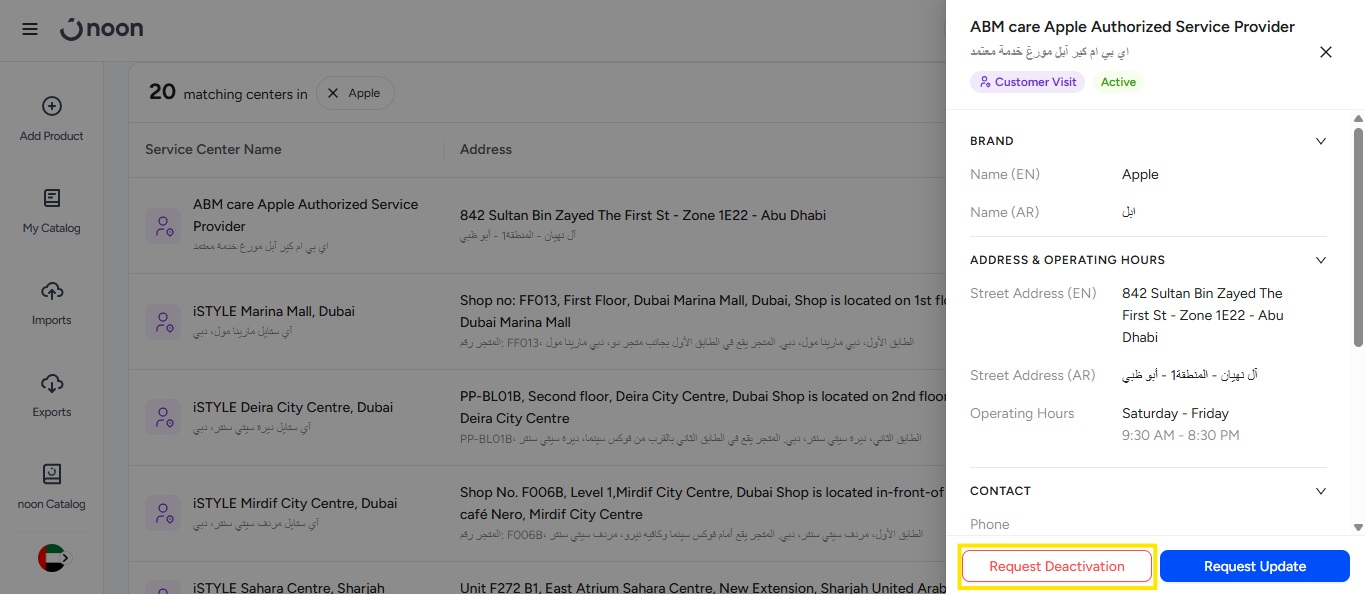
- This opens a pop-up to select the reason of deactivating the warehouse, some additional information, and the acknowledgement from your end. Once you have made the necessary selection click on Submit. This will raise a request for the deactivation of the service center.
Handling Rejected Requests
If the operations team finds incomplete or missing information, your request may be turned down. Don't worry—you can easily correct it.
- Go to My Requests and filter the status by Rejected
- Click on the rejected request you want to submit.
- This will open the sidebar panel, and you can review the feedback note (e.g., Incomplete or missing information).
- Click the blue Edit & Resubmit button at the bottom.
- Validate and update all necessary information in the first page, then click on Next.
- Fill in all the information about the working hours, contact information, and Available service options. Then click Submit to send it back for approval.
Reactivating an Inactive Service Center
If a previously deactivated service center reopens or begins operations again, you can request its reactivation.
- Go to the Directory tab and select the Brand, Family, and Product Type.
- Then scroll down and click on View All.
- Then change the Status filter drop-down from Active to Inactive to see your closed locations.
- Click View Details on the inactive service center.
- A pop-up appears from the side with an option to the blue Request Reactivation button.
- Another pop-up appears on the screen where you need to choose your Reason (e.g., Service center is operational or Service center is authorised for this brand) and provide Additional Information. Make sure to review and update all required and necessary information within the portal before clicking Submit to ensure a swift approval by the operations team.
Filter for Viewing Service Center Types
To maintain excellent customer satisfaction and smooth warranty processing, sellers are highly encouraged to perform regular self-audits of their catalog’s service network.
You can easily browse and audit your setup by running a targeted search on the dashboard.
- Go to the Catalog, then click on My Service Center
- Then click on Directory.
- Then select the Brand, Family, and Product Type.
- Scroll down and use the Service Type filter (to toggle between Virtual and Customer Visit) or the Status filter (to toggle between Active and Inactive) to ensure every segment of your business profile looks perfect.
Need Additional Support?
If you have any questions or require custom assistance during your registration, please reach out directly to the support team at noonwarrantycommunications@noon.com.
Related Articles
Seller Warranty Policy
Introduction The warranty commitment you provide to customers is instrumental in strengthening consumer trust and confidence, encouraging them to purchase your products on the noon platform. As a seller, you are accountable for upholding this promise ...Warranty Requirements
Providing a clear product warranty builds trust with your customers, protects your brand reputation, and ensures compliance with consumer protection laws. When listing products on noon, you must choose the correct warranty classification and duration ...Global Seller Warranty Policy
Note: This article applies only to sellers shipping from the UAE to customers in Saudi Arabia (KSA). Seller's Warranty Responsibility As a seller participating in Noon’s Global Selling Program, you are fully responsible for the warranty of any ...Seller Buyer Messaging Service
This article provides an in-depth look at the Seller Buyer Messaging Service, which facilitates direct communication between sellers and customers specifically for handling DirectShip customer returns. Please note that this service is intended solely ...Third Party Warranty Rate Card- KSA (Refurbished and Renewed)
This article gives you a complete rate card for the warranty repair charges for different categories and the type of repair. Before we discuss the rate card in detail, let's understand how warranty charges work for renewed items, where the warranty ...